
Overall project updates
Work started on the final report and the demo video.
Overall project updates
Final touches on app cleaning up wiring in the enclosure. Prepared talking points and slides for the Symposium presentation that was also presented this week.
Overall project updates

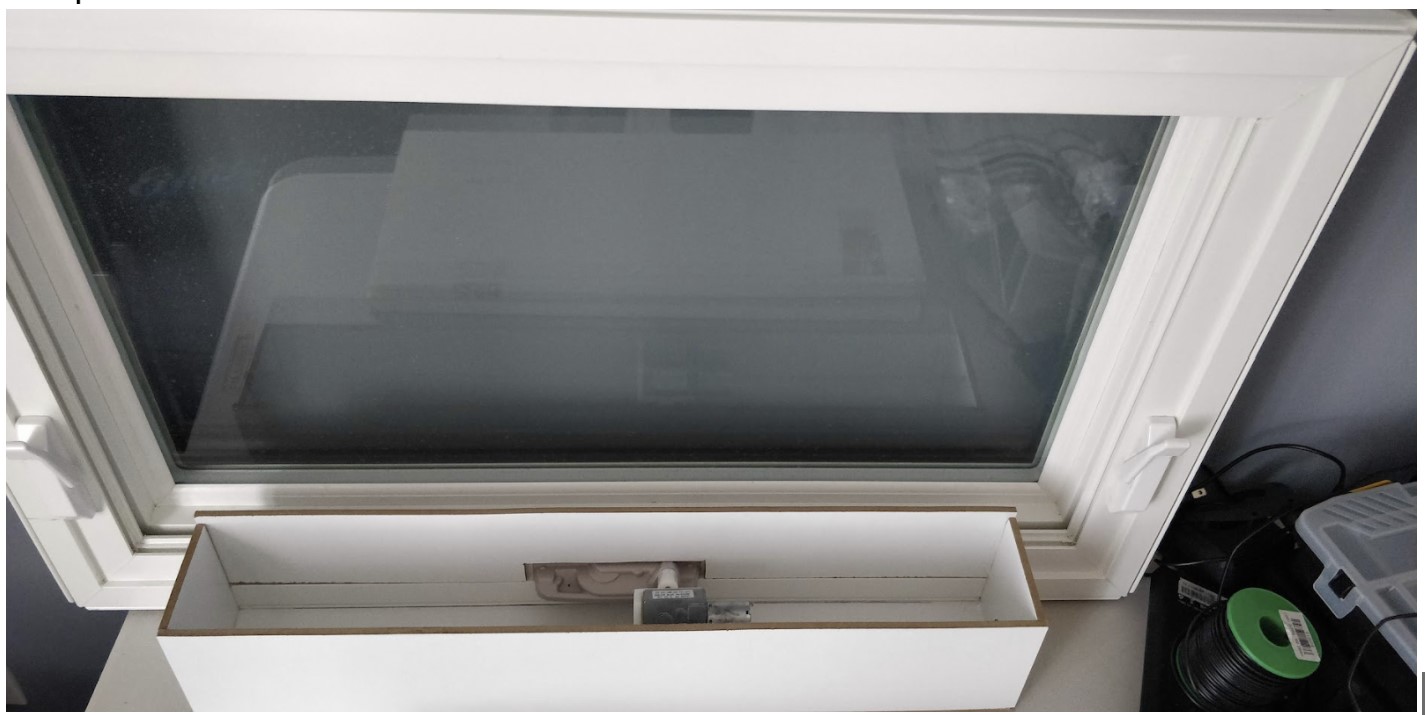
Poster and marketing video complete. Final touch-ups to the window to make it presentable for the video like filling in gaps of foam and cleaning the window were also completed.
Rehearsed for symposium demo day!
Software updates
Tested app UI constraints on multiple interface sizes and fixed constraints to make sure the UI fits all phone screens. Backgrounds were extended for larger phones, and button sizing was changed to properly dimension on all phones. Changes between different android versions also affected default background colours for the apps, so backgrounds had to be changed and further constrained.
Overall project updates
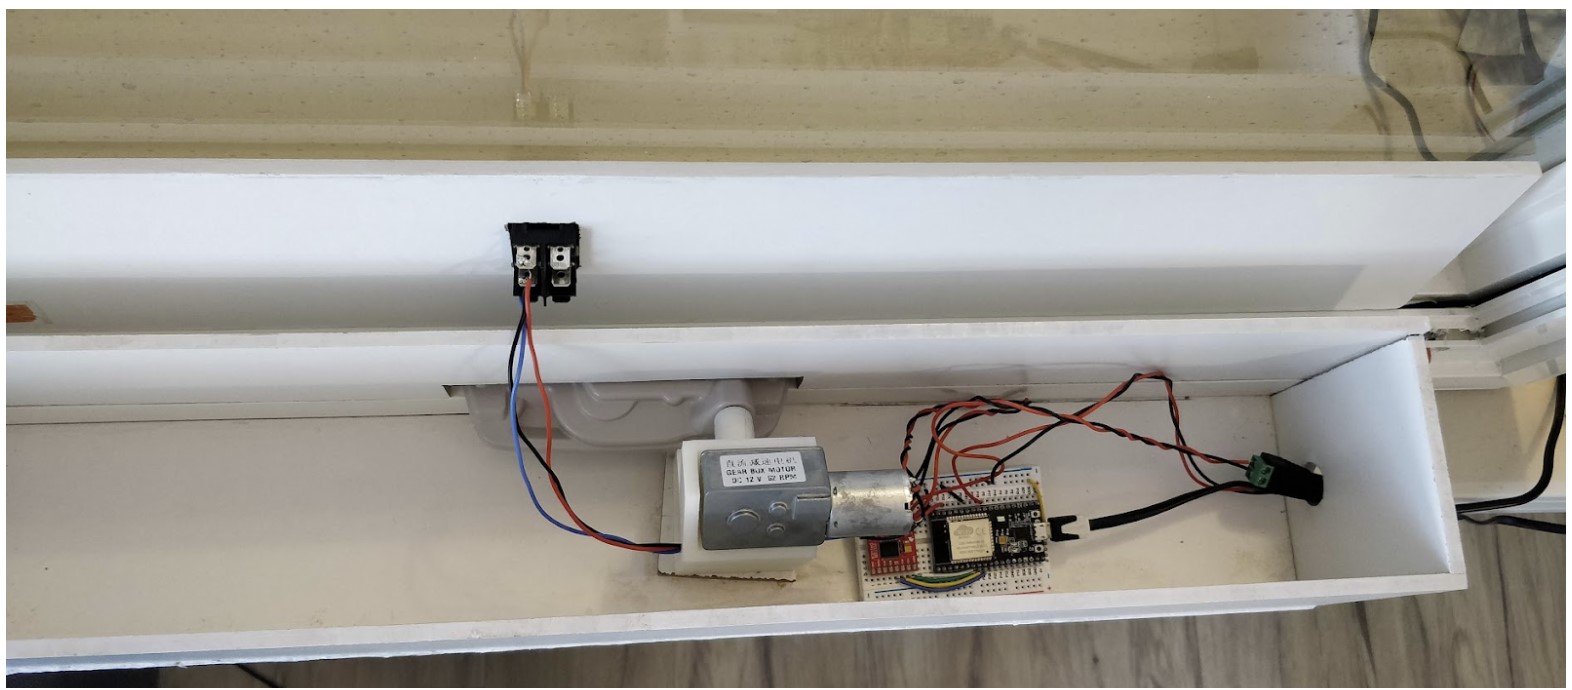
Installed acoustic foam to the inner enclosure to reduce the sound from the motor. It had a substantial effect compared to the previous noise. This reduces the noise produced by the motor and also dampens additional noise caused by vibrations. New wires were soldered to the manual switch so the wires could reach the breadboard that was installed in the enclosure.

Overall project updates
The enclosure is completed with the motor and electronics all attached. Wires were cut to minimum lengths for a cleaner look internally. Testing was successful manually with the switch and Google voice assistant, as well as automatically with simulated temperatures. The limit switch embedded inside the window frame is also able to automatically stop the motor once the window is closed.
There were some issues with the noise of the motor, most likely due to choosing an inexpensive motor that only satisfied our power and torque requirements. In hindsight, a constraint on the noise of the motor should have been specified. Regardless, we are working towards muffling the current motor using foam within the enclosure and ensuring the lid of the enclosure is properly fitted.

Software updates
Database updating rate was increased in order to improve responsiveness of data display on the app. Threading optimizations for the run on UI threads were implemented to help decrease number of frame skips on updates.
Software updates
Significant progress was made on the Raspberry PI software this week, with a lot of focus on the Climate module and getting the climate algorithm working. Currently it is only using temperature data to determine which climate control method is required, but in the future we will be adding humidity and weather as factors. The basic idea of the algorithm is that the user sets a desired temperature they want the house to reach, and the algorithm determines if it is possible to do so through natural ventilation, and if not then it will turn on the A/C. Once the desired temperature is reached, the algorithm determines whether or not the windows should be opened or closed to maintain the temperature. The PI was also updated to handle new MQTT topics coming from the ESP32, Ecobee simulation, and the user app.
We also worked on achieving control using a home assistant. After some research, we found a tutorial for the Google Assistant which looked promising. It took a lot of debugging but eventually we got the open and close commands to work somewhat consistently. We used a service called IFTTT (If this then that) which allows you to connect two separate services together and create an applet to perform your desired task. In this case, we made it so that if you ask the Google Assistant to open or close the window, it would send an http request to a local server on the PI. The PI can then process that request and send an MQTT topic to the main script to open or close the window. There are still some issues with occasional error codes where the http request is not sent successfully and these are being worked on.
Significant progress on the coding of the app backend was completed. Base MQTT communication was set up using the new MQTT topics that the PI was configured to accept. MQTT subscriptions were setup to regularly log the indoor temperature, outdoor temperature, and window status information into a SQLite Database. Data is taken from this database for the displays. The buttons were also set to send MQTT messages to the Pi. Specifically window open and closed commands were configured as well as the only entry point for the automatic window setting.
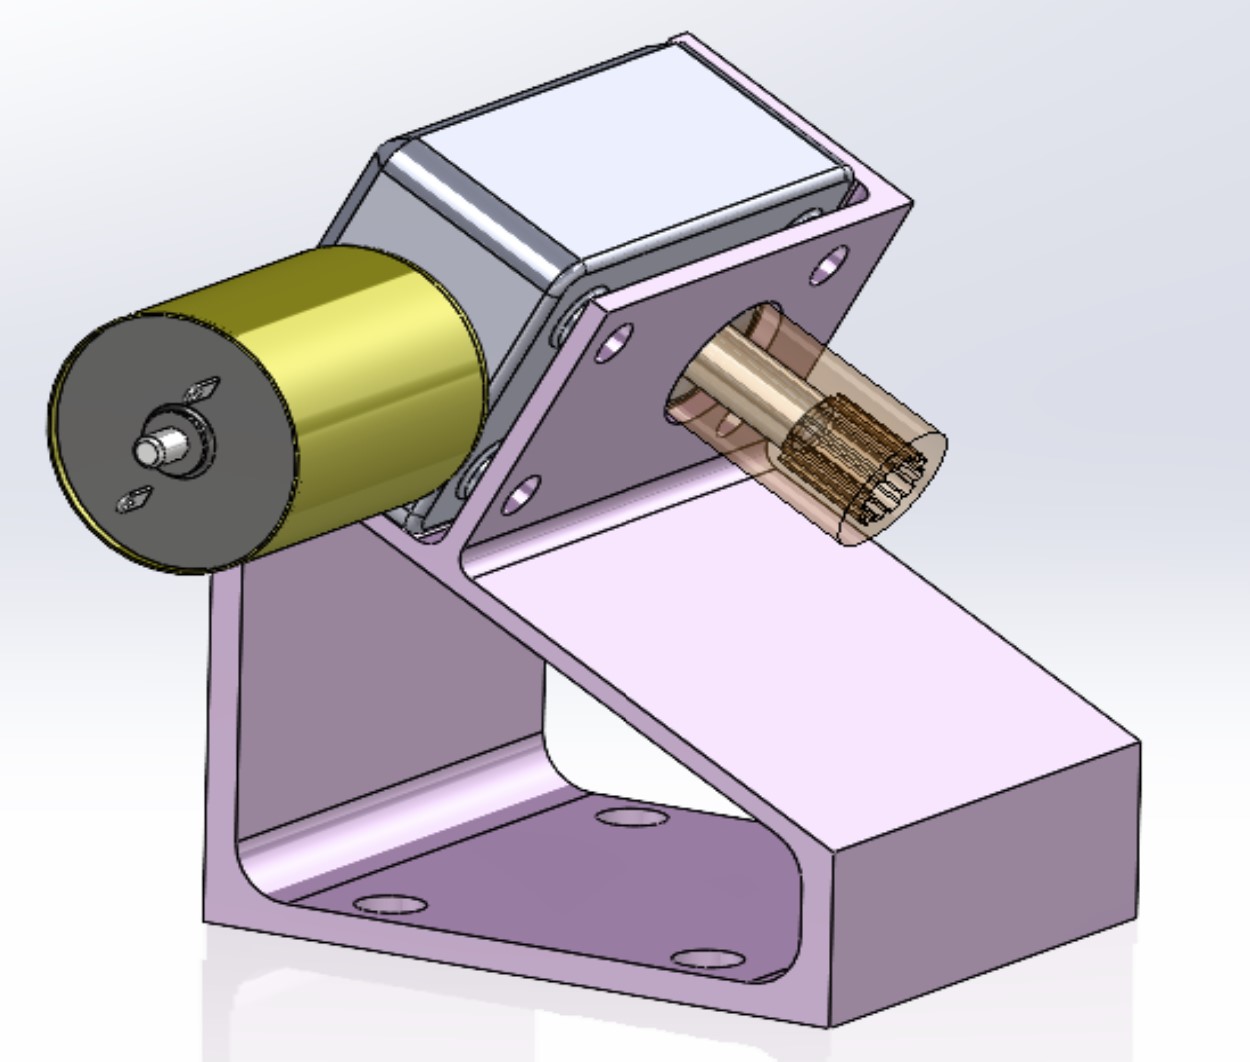
Mechanical updates
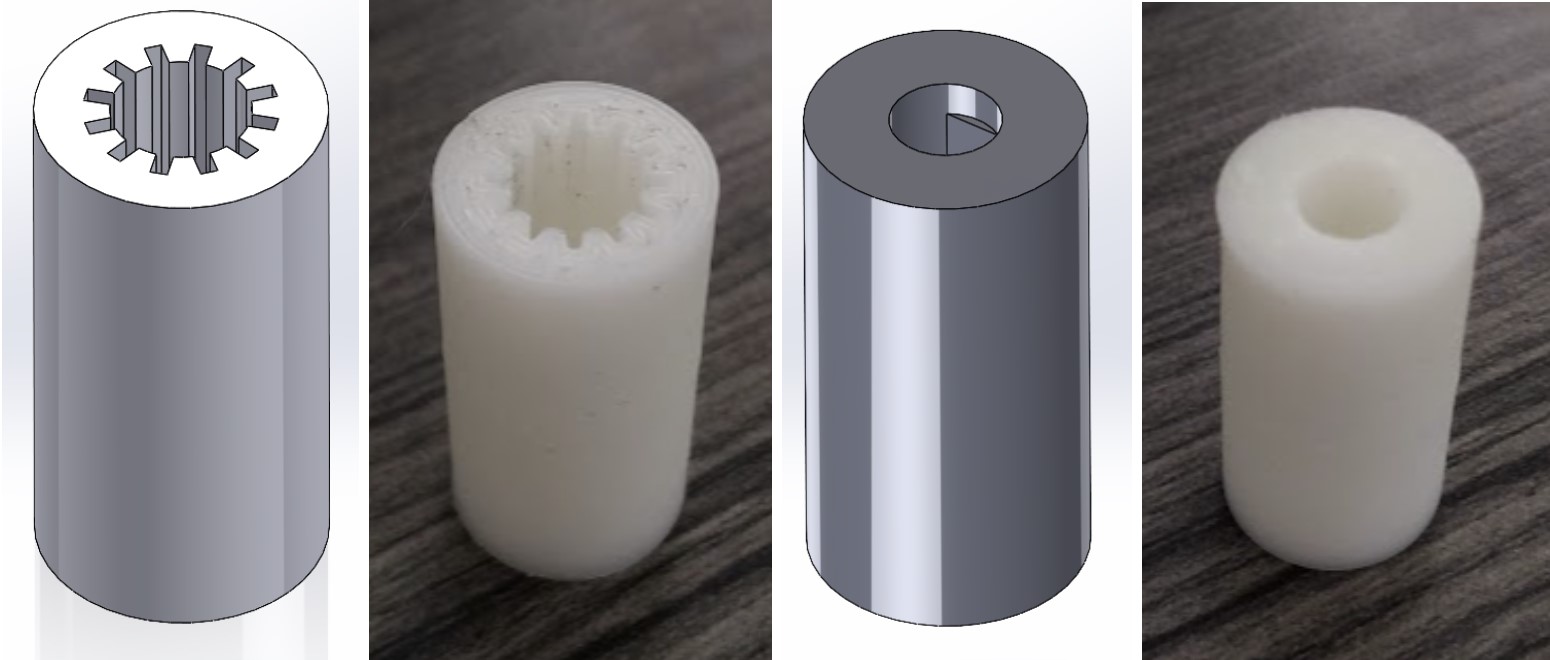
The motor enclosure is assembled using waterproof wood sealant, less the top cover until the electronics are connected and tested. The motor coupler had an anomalous fracture most likely due to manual turning of the part to open/close the window. This was repaired, but 5 more couplers were printed in the event that further testing causes this problem to reoccur.

Mechanical updates
The motor holder was slightly redesigned to fit the new motor-gear attachment and to reduce the amount of material required to print. It was 3D printed and tested with the window. Screws and waterproof coated ¼” wood was purchased to create the enclosure and mount the motor holder. This will be worked on later next week. The motor had a small malfunction where internal screws came loose, but this was quickly resolved by taking it apart, tightening the screws, and realigning the gears.

Software updates
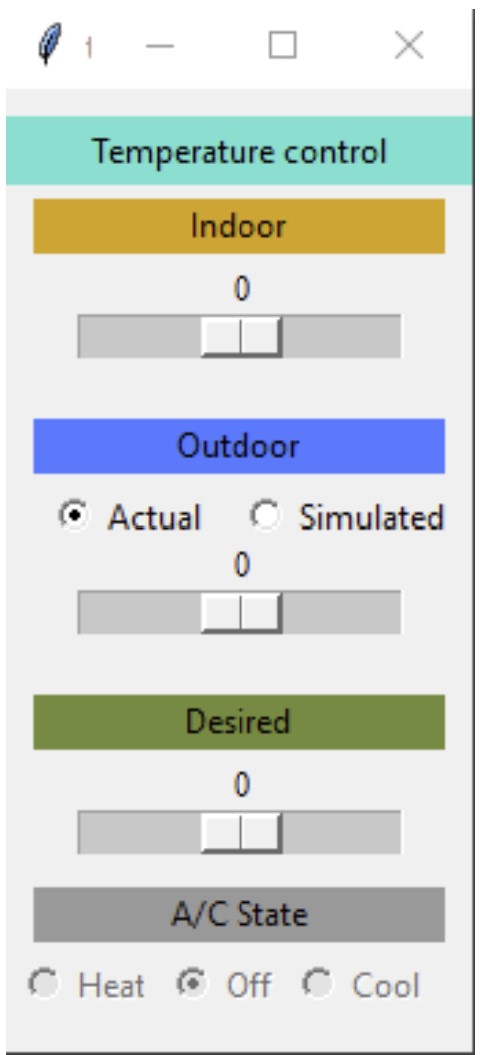
An initial simulation of an Ecobee thermostat was created this week. This would allow us to simulate indoor and outdoor temperatures to show that our climate control algorithm is working as intended. The simulated Ecobee provides temperature sliders to easily manipulate system temperatures, and has A/C indicators to show whether the A/C is turned on with the given temperatures. It also has the option to use simulated or real outdoor temperatures. The Ecobee simulation communicates with the Raspberry PI using MQTT. The initial application can be seen below.
The firmware on the ESP32 was finalized this week with minor fixes to the limit switch logic and additional MQTT topics added for data to be sent to the user app. Additionally, the MQTT broker IP is now being sent during the Bluetooth transfer to ensure that the correct IP is used.

Initial framework for the app was created. Quick mock-ups for the layouts based on preliminary needs requirements were created. It was determined that the app would require a SQlite database for keeping data up to date when loading in the app.
Significant work was completed on constraint layouts for the app to ensure that the display would be responsive to different devices sizes. This was primarily focused on the window control aspect of the app, layouts for the home page and data page are still to be completed.
Base proof of concept on the MQTT protocol was completed. A simple subscription on temperature data was completed, and it was determined that for all the App communication to work, a new set of MQTT topics would be required.
Software updates
To-dos
Mechanical updates
Printed a final version of the motor-gear attachment. Tested the motor and motor driver to confirm that the motor with the new attachment can open/close the window. Now that the motor-gear attachment is complete, the motor holder can be slightly modified to meet the new length requirements.
Software updates
Once the motor driver arrived, it was connected to the ESP32 via the IN1, IN2, PWM, and STANDBY pins, which allow the ESP32 to send motor control signals. A simple motor driver was implemented for the ESP32 which can drive the motor clockwise or counter-clockwise for a given duration. This was then tested using a cheap 5V motor as the 12V power adapter for the actual motor had not arrived yet. Once the adapter arrived, it was also tested on the actual motor and worked well.
The 3 state rocker switch and limit switch were added next. The 3-state rocker switch controls the motor and allows users to open and close the window manually. If opening, the ESP32 keeps track of the position of the window which allows it to stop the motor once the window is fully opened. When closing, the window will continue to close until the limit switch in the window frame is pressed, signifying that the window has fully closed.
Mechanical updates
Received 12VDC transformer, testing of motor successfully opened/closed the window. Issues with centering the store-bought coupler requires a coupler with 4 mounting holes or a 3D printed part. A 3D printed part was designed and printed which fit perfectly on the gear side, but had minor tolerances issues on the motor shaft side. A Dremel will be used to widen this hole, and if there are still issues a reprint will be issued for next week.
Software updates
Development started on the Raspberry PI side. First, the PI’s functionality as an MQTT broker was implemented. The PI uses Eclipse Mosquitto to implement the MQTT protocol and designates itself as the broker. Then, any MQTT devices in our system can communicate with each other through the PI. A few topics were created to allow communication from the PI to the ESP32. These include motor control, status, and other topics.
Next, a separate thread was created on the PI to poll Open Weather Map’s for weather data in the current location. This will be used later in the window algorithm. Finally, an ESP32 class was added to create functions for control of the ESP32. Some functions added were update_config which allows the Wi-Fi credentials and topics of the ESP32 to be updated, and command_motor which sends a open/close command to the window.
Mechanical updates

Received the shipment for the motor-gear coupler that had to be sanded down slightly on the inner-diameter to fit over the window gear. Due to not having the 12V adapter yet, a 9V battery was used to check if the motor with the coupler would open/close the window. This was a success! The coupler was also heated up so it could slide over the gear better, as the tolerances were very close and we did not want to damage the gear teeth on the window.
All parts have been purchased with some electrical parts still in transit.
Software updates
Software development began with the ESP32. MicroPython was installed onto the board which allows us to program it in an embedded version of Python. A simple state machine was created for the main loop which allows the ESP32 to iterate through the various stages of initialization before running the main code and allows it to return to initialization if an error occurs. A JSON file was created and added to the ESP32 which specified various configurations such as Wi-Fi credentials, MQTT topics, and more.
When the ESP32 boots, it enters the initialization state where it checks its config file to ensure that it is populated properly. If it has saved credentials for Wi-Fi, it will then attempt to connect. If there are no credentials, or the saved credentials are invalid, the ESP32 will disable Wi-Fi and enable its Bluetooth Low Energy (BLE) antenna. In the Bluetooth state, the ESP32 will advertise itself, allowing other devices to connect. These devices can then tell the ESP32 what the Wi-Fi ssid and password are. Once the ESP32 receives these, it will again attempt to connect to the Wi-Fi. Failure will lead back to the Bluetooth state, while success will allow the ESP32 to continue initializing.
Once a Wi-Fi connection has been established, the ESP32 will then attempt to connect to the MQTT broker, which in this case is the Raspberry PI. The ESP32 will remain in this state until the PI is booted and connects to the Wi-Fi. Once the MQTT connection has been established, the ESP32 can enter the running state, where it will run all the primary functionalities.
Software to-do's
Mechanical updates
Due to 3D printing resources being unavailable, the original intention to 3D print the coupling connecting motor to the window crank was replaced with a metal option. If this item were to be 3D printed it would require high precision, possibly multiple times of printing. Replacing the part would be easier under the circumstances of no 3D printer.

Motor stand will either be built from wood or wait to be 3D printed. 3D printing option is preferred, since this item could be easily printed, not needing a ton of filament, with little room for error.
Since a new coupler has been selected, the enclosure must be resized to ensure fit.
App design

The app's main functionalities will be to allow the user to manual control window opening and closing. In addition, they can how much energy they have saved since using the window.
Overall, progress is on track. Slightly behind in electrical due to parts in transit and ahead in software.